This lab is all about writing functions, especially recursive ones!
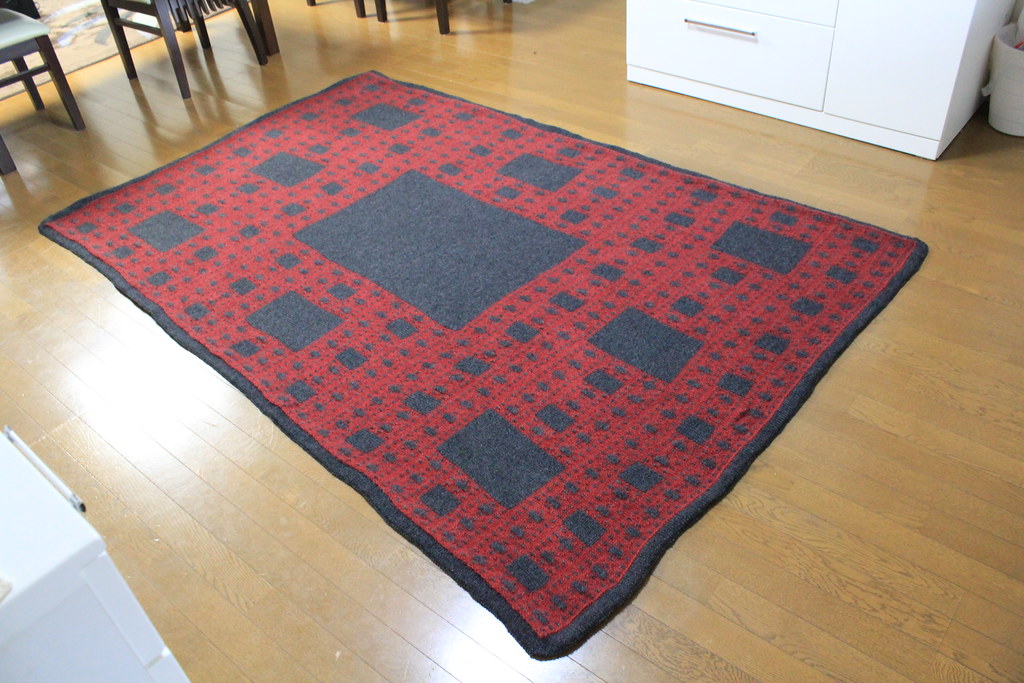
To that end, you are going to create programs that create fractal
images:
-
These are images where a part, or parts of the image, is the same as the entire
image but on a smaller scale.
Fractals have lots of applications in engineering and pure mathematics.
Submission
~/bin/submit -c=IC210 -p=lab11 part*.cpp
|
|
Credit:
Feliks Tomasz Konczakowski
|
Part 1: Can you repeat that please?
To start we will write a helper function repeat that will be
helpful for drawing the fractal patterns for the rest of the lab.
Download part1.cpp In this file, you will find a main
method that is completely written for you, and a prototype for a function that
you need to write:
// Prints out the string s, count times in a row,
// in a single line.
void repeat(string s, int count);
Use recursion.
We know you could write the definition of this function using a loop. But to
get started, your task is to write the definition of the repeat
function using recursion.
Don't change the main() function at all.
You should not change main at all for this part — just get
repeat working perfectly and submit.
Strings for Unicode symbols.
You should notice some unusual-looking strings in the main function
such as
string DIAMOND = "\u2bc1";
As you saw in Project 2, this is a special non-ascii symbol called
Unicode. The important thing to know is that, even though it prints out
as a single symbol in the terminal, it has to be stored as a string and not a
single char.
We’ll use these unicode symbols in the rest of
the lab!
Part 2: Cantor Set
Once the first part is working perfectly, copy your repeat function
into the part2.cpp file to get started on this part.
Our first fractal image will be a one-dimensional visualization of the Cantor Set. This is an
important mathematical set with some surprising properties: for example, it is
completely “empty” and doesn’t contain any sub-interval of the real line, but it
simultaneously has more elements than all of the possible fractions (in terms of
cardinality).
But all that doesn’t matter to us; we are just drawing some ASCII art!
Your task
Write a program part2.cpp that reads in a size from the user, and
prints out in a single line the Cantor set for that size, using X
and _ characters.
Example runs:
~$ ./part2
size: 1
Width-1 Cantor set:
X

~$ ./part2
size: 3
Width-3 Cantor set:
X_X

~$ ./part2
size: 9
Width-9 Cantor set:
X_X___X_X

~$ ./part2
size: 27
Width-27 Cantor set:
X_X___X_X_________X_X___X_X
|
|
Make sure to understand the recursive relations applied in the examples.

Width-1 Cantor set
= Base case


Width-3 Cantor set =
Width-1 Cantor set + Width-1 empty region + Width-1 Cantor set


Width-9 Cantor set =
Width-3 Cantor set + Width-3 empty region + Width-3 Cantor set


Width-27 Cantor set =
Width-9 Cantor set + Width-9 empty region + Width-9 Cantor set
|
Recursive definition of a Canter set
Here is a good definition of the Cantor set for our purposes:
A Cantor set of
length n has three equal parts:
- a Candor set of length n/3
- an empty region of length n/3
- a Cantor set of length n/3
Notice how this definition is recursive! The actual Cantor set goes on
infinitely into smaller and smaller recursive sets.
Base case
In order for this to work in a computer program, it needs to have a base case!
Here is how you will make that work:
In your program
- a Cantor set of length 1 will be represented by a single
X on
the terminal.
- The empty regions will be represented with underscore characters
_.
Your program will work and look good for any (positive) size that is given,
but to avoid specifying the details on rounding the auto-tests will only
use powers of 3 for sizes like 1, 3, 9, 27, 81, etc.
Hints
You will definitely need a recursive function to print out the
Cantor set, something like
void cantor_row(int length);
This function should not include printing a newline at
the end of the line (although you should do that in main).
Why not? Well, this needs to be a recursive function that calls itself
multiple times, but you only want to print a single newline character for the
whole program, not one for each recursive call!
- Use the
repeat function to print out the multiple
_s.
Part 3: The full Cantor
Copy part2.cpp to part3.cpp before starting on this part.
Now we want to show the step-by-step creation of the Cantor set on multiple
lines, all with the same width. So you should start with a line of all
Xs, then a line with the middle third removed, and so on, ending
with the last line like you printed in your part 1.
See some examples below. Again, we will only run auto-testing on
power-of-three sizes, even though your program should print something that looks
good for any given size.
You should keep your functions from Part 2, repeat and
cantor_row.
But now you will want to modify cantor_row. You might want
to add another parameter to keep track of how many levels to go down in the
recusion. So the prototype might look like:
void cantor_row(int width, int levels);
- You’ll call
cantor_row from
main to print each line of the output.
In particular, you would call cantor_row(width, 0) to print the first
line (followed by a newline), then call cantor_row(width, 1) to
print the second line, etc.
- It’s okay to use a loop in
main to print out each line using
cantor_row.
- Needless to say, it is important to find out the recursive relation used for
cantor_row. As with Part 2, try to
relate cantor_row(n,
?) with cantor_row(n/3, ?).
-
You may want to think about the recursive
relation using small-width cases first:
-
cantor_row(3,0) = recursion ???
-
cantor_row(3,1) = recursion ???
Then, move on to the case of width 9 and then width 27 and so on to verify your guess.
|
~$ ./part3
size: 1
Width-1 Cantor set:
X

~$ ./part3
size: 3
Width-3 Cantor set:
XXX
X_X

~$ ./part3
size: 9
Width-9 Cantor set:
XXXXXXXXX
XXX___XXX
X_X___X_X

~$ ./part3
size: 27
Width-27 Cantor set:
XXXXXXXXXXXXXXXXXXXXXXXXXXX
XXXXXXXXX_________XXXXXXXXX
XXX___XXX_________XXX___XXX
X_X___X_X_________X_X___X_X
|
cantor_row(1,0)


cantor_row(3,0)
cantor_row(3,1)


cantor_row(9,0)
cantor_row(9,1)
cantor_row(9,2)


cantor_row(27,0)
cantor_row(27,1)
cantor_row(27,2)
cantor_row(27,3)
|
|
-
You also need to think about how your program can determine how many lines need
to be printed. There are multiple ways to do this!
- You should notice that it depends on what power of three you get for the
original size, so one way is to make a separate function that takes in the
size and figures out how many lines of output will be needed.
- Another way, which is a little trickier, is to change the
cantor_row so that it returns a bool to indicate
when it’s on the last line or not.
Part 4: Going further, Carpet
Now let’s try to make some two-dimensinal fractals! The first shape is called a
Sierpinski
carpet and it’s kind of the 2D version of a Cantor set, but it looks way
cooler:
(source: AnaMarie)
~$ ./part4
size: 1
Width-1 Sierpinski carpet:
♦
~$ ./part4
size: 3
Width-3 Sierpinski carpet:
♦♦♦
♦ ♦
♦♦♦
~$ ./part4
size: 9
Width-9 Sierpinski carpet:
♦♦♦♦♦♦♦♦♦
♦ ♦♦ ♦♦ ♦
♦♦♦♦♦♦♦♦♦
♦♦♦   ♦♦♦
♦ ♦   ♦ ♦
♦♦♦   ♦♦♦
♦♦♦♦♦♦♦♦♦
♦ ♦♦ ♦♦ ♦
♦♦♦♦♦♦♦♦♦
~$ ./part4
size: 27
Width-27 Sierpinski carpet:
♦♦♦♦♦♦♦♦♦♦♦♦♦♦♦♦♦♦♦♦♦♦♦♦♦♦♦
♦ ♦♦ ♦♦ ♦♦ ♦♦ ♦♦ ♦♦ ♦♦ ♦♦ ♦
♦♦♦♦♦♦♦♦♦♦♦♦♦♦♦♦♦♦♦♦♦♦♦♦♦♦♦
♦♦♦   ♦♦♦♦♦♦   ♦♦♦♦♦♦   ♦♦♦
♦ ♦   ♦ ♦♦ ♦   ♦ ♦♦ ♦   ♦ ♦
♦♦♦   ♦♦♦♦♦♦   ♦♦♦♦♦♦   ♦♦♦
♦♦♦♦♦♦♦♦♦♦♦♦♦♦♦♦♦♦♦♦♦♦♦♦♦♦♦
♦ ♦♦ ♦♦ ♦♦ ♦♦ ♦♦ ♦♦ ♦♦ ♦♦ ♦
♦♦♦♦♦♦♦♦♦♦♦♦♦♦♦♦♦♦♦♦♦♦♦♦♦♦♦
♦♦♦♦♦♦♦♦♦         ♦♦♦♦♦♦♦♦♦
♦ ♦♦ ♦♦ ♦         ♦ ♦♦ ♦♦ ♦
♦♦♦♦♦♦♦♦♦         ♦♦♦♦♦♦♦♦♦
♦♦♦   ♦♦♦         ♦♦♦   ♦♦♦
♦ ♦   ♦ ♦         ♦ ♦   ♦ ♦
♦♦♦   ♦♦♦         ♦♦♦   ♦♦♦
♦♦♦♦♦♦♦♦♦         ♦♦♦♦♦♦♦♦♦
♦ ♦♦ ♦♦ ♦         ♦ ♦♦ ♦♦ ♦
♦♦♦♦♦♦♦♦♦         ♦♦♦♦♦♦♦♦♦
♦♦♦♦♦♦♦♦♦♦♦♦♦♦♦♦♦♦♦♦♦♦♦♦♦♦♦
♦ ♦♦ ♦♦ ♦♦ ♦♦ ♦♦ ♦♦ ♦♦ ♦♦ ♦
♦♦♦♦♦♦♦♦♦♦♦♦♦♦♦♦♦♦♦♦♦♦♦♦♦♦♦
♦♦♦   ♦♦♦♦♦♦   ♦♦♦♦♦♦   ♦♦♦
♦ ♦   ♦ ♦♦ ♦   ♦ ♦♦ ♦   ♦ ♦
♦♦♦   ♦♦♦♦♦♦   ♦♦♦♦♦♦   ♦♦♦
♦♦♦♦♦♦♦♦♦♦♦♦♦♦♦♦♦♦♦♦♦♦♦♦♦♦♦
♦ ♦♦ ♦♦ ♦♦ ♦♦ ♦♦ ♦♦ ♦♦ ♦♦ ♦
♦♦♦♦♦♦♦♦♦♦♦♦♦♦♦♦♦♦♦♦♦♦♦♦♦♦♦
|
|
Your task is to make a program part4.cpp which
reads in a size from the user, and displays a Sierpinski carpet of that
size.
Here’s the recursive definition:
A n * n Sierpinski carpet divides the square into 9 smaller (n/3) * (n/3) squares.
- Each of the 8 outside squares is a (smaller) Sierpinski carpet.
- The square in the middle is empty.
See sample runs on the left.
To make this look good, we don’t want to use X’s and underscores this time.
Instead, use actual spaces " " for the blank space, and use
diamonds ♦ for the base case of a 1x1 carpet. Because the diamond is not a
normal ASCII character, it can’t be represented with a normal char
type in C. However, you can represent it as a string using the Unicode
syntax:
string DIAMOND = "\u2bc1";
cout << "Here is a diamond:" << DIAMOND << endl;
Hints
Even though the fractal image recurses in two dimensions, your program
still works only one row at a time! You probably want to make a function to
output a single row, with a signature like
void carpet_row(int width, int row_index);
where the parameter row_index represents which row of the image
is being produced.
If you follow this suggestion and start your row_index at 0,
then, for example, calling carpet_row(27,12) should produce the
13th row of the example above, which looks like this:
♦♦♦ ♦♦♦ ♦♦♦ ♦♦♦
You will probably want to copy your repeat function from the
previous part and use it again! Like before, you should not print out any newlines in the
recursive carpet_row function, because this function has to be
called (recursively) many times to produce a single row of the image.
You still need to print a '\n' at the end of each line, but
should do this outside of carpet_row, perhaps in main.
|
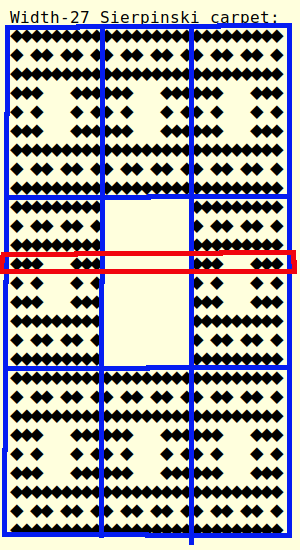
More detailed explanation
He is a more detailed explain of how to think about the recursive function
carpet_row, using the example of printing the 13th row
of a width-27 carpet by calling
carpet_row(27, 12).
Here is the image we are trying to produce, with this particular row
highlighted in red, and with the 9 sub-regions outlined in blue:
|
So now we can see that this row (in red) needs to go through three parts:
- The fourth line of a 9x9 carpet, which we can draw by using recursion with
carpet_row(9, 3)
- 9 blank spaces, which we can draw using the function you made from before with
repeat(" ", 9)
- The fourth line of another 9x9 carpet, which will be another recursive call
to
carpet_row(9, 3)
Things to notice about this example:
- The row index changed in the recursive call, from 12 to 3.
We subtracted 9 in this case because row 13 of the original
image corresponds to row 4 of the regions in the middle third.
- The middle part of the row is empty. That is because we are in the
middle third of the carpet according to the row index. If we were a row
from the top third or bottom third, then there would be no empty middle
part but three recursive calls instead.
The most important thing to remember is to use recursion - it's very
powerful and will help your program stay simple! If you find your self writing
many complicated if/else cases and very long functions, ask for help because you
are probably going in the wrong direction.
|
A well-written recursive program will be nice and simple at the end,
but it can be tricky and take lots of patience to get there.
You will have to think hard about what you want the program to do,
and then be very patient and thorough in debugging.
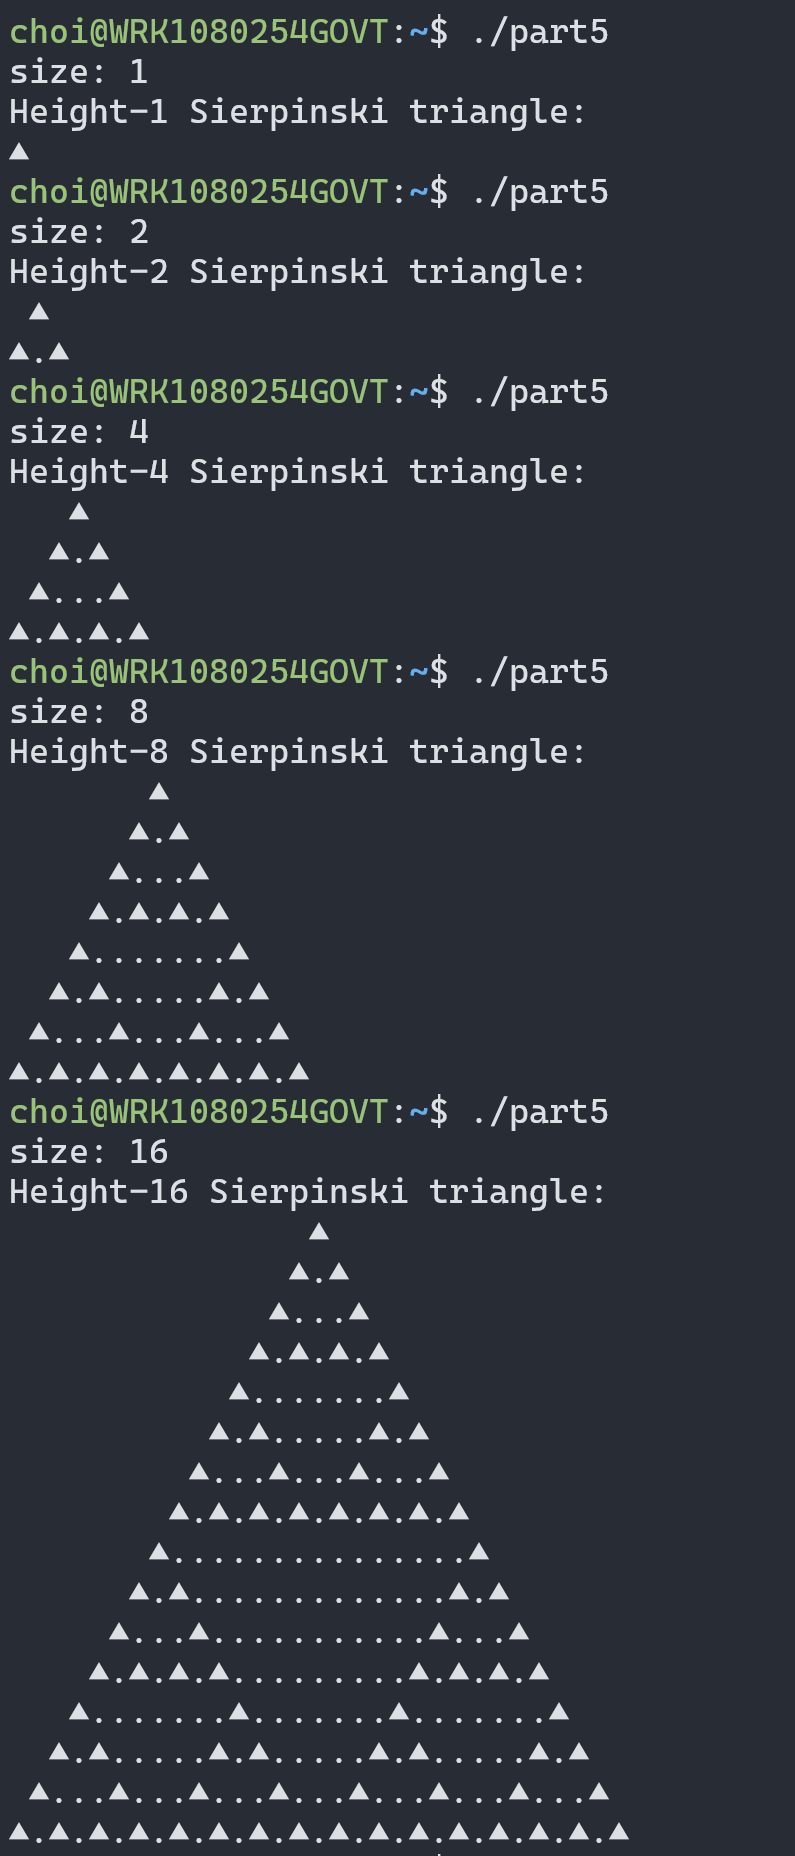
Part 5: Extra credit: The famous triangle
|
|
The Sierpinski
triangle is one of the most famous and beautiful fractal patterns.
It consists of three half-height Sierpinski triangles (recursive!) arranged with
an upside-down blank triangle in between them.
See on the left some example runs to show how your program should work.
For this program, you should use a triangle character to print the base case
of a 1x1 triangle using this
string:
"\u25b2"; // ▲
Print the inside spaces of the triangle with a dot character
".".
Similar to before, we will only perform auto-tests at power-of-two sizes like
1, 2, 4, 8, 16, 32, etc., but it might be fun to make your program work somehow
for any possible size. Note that the size given is the height of the
triangle your program should create; the width should be 2h-1.
I want you to work hard and figure this out, but here are a few hints:
- One aspect which makes this one a little trickier than the carpet is that
the sub-regions don’t line up into a rectangular grid quite so nicely. The
top-half triangle is exactly halfway between the two bottom-half triangles,
with blank space on either side.
- Even though you are drawing triangles, think about the (smallest) rectangle
that contains each recursive triangle. Fortunately, these rectangles don’t
overlap. Your program has to print out all the characters (including spaces)
inside this rectangle!
- I recommend making a recursive function to print out a single row a
Sierpinski triangle with a given width.
- The auto-tests expect there to be no extra spaces at the
end of each line after the last ▲ symbol. It will be tricky to get this to
work correctly; you might try adding another parameter to your recursive
function to help you!
|