IT360 Lab1: The Squadron Flight
Schedule using Access
DUE: Monday January 20, 2014 before 2359
MS Access is frequently used by small companies and on the Navy ships to create simple database solutions. Using Access, you don’t have to know too much about databases and will still be able to easily construct simple, aesthetically pleasing database solutions. This lab is designed for you to learn some of the basics of Access. You will build a solution to a simple problem using just a single table, a single form, a report, and a switchboard. There are ample online tutorials and the Access “Help” system is very detailed. Use any resources at your disposal to accomplish and understand the tasks required of this lab. You may consult other students on using Access but all work should be your own (i.e. do not copy other students tables, forms, etc).
Part 0: Create the database
Open Microsoft Access 2010 and create a new blank database called yourlastname_lab1.accdb, where yourlastname is your last name. Save it on your X drive, not the local machine, so you can access it from your room.
Part 1: Tables
The simple “flight schedule” database you will build for this lab requires only a single table. A table should contain data for only a single “theme”, so the theme of this table is a flight event. Table basics will be discussed in lab and there is a tutorial on the course webpage covering Access basics. You are responsible to be able to do the following:
- Design view creation of tables
- Appropriate data type selection
- Field properties and input formatting
- Primary key
- Validation rules
- Adding, deleting, and manipulating records in the table.
a) Create a table called Flights with the following fields. Be sure data input by the user passes any validation requirements as specified in the following table:
|
Name |
Type/format |
Required |
Validation
Rule/ Validation Text |
Comments |
|
FlightDate |
Date/Time -Short date (mm/dd/yyyy) |
Yes |
Must be a date after
1/1/2014 |
Date of flight |
|
FlightSeqNumber |
integer |
Yes |
|
Flight number within a
given day |
|
PCLastName |
text |
Yes |
|
Last name of plane commander |
|
PCFirstName |
text |
Yes |
|
First name of plane commander |
|
Takeoff |
Short time |
Yes |
|
Takeoff time |
|
Landing |
Short time |
Yes |
|
Landing time |
|
EventType |
Text |
Yes |
The only valid
inputs are: §
“PT” for pilot
training §
“MI” for
mission §
“CT” for crew
training §
“MC” for
maintenance checks |
Type of event |
|
Comments |
Text |
No |
|
Lists training or mission
information |
b) Declare the combination of FlightDate and FlightSeqNumber columns as a primary key for the table. (In Design view, select both fields, right-click, and select “Primary Key” from the menu)
Notes:
1. If the user enters an invalid EventDate (before 1/1/2014), a message must be displayed explaining the reason for error.
2. If the user enters an invalid EventType, a message must be displayed explaining the valid options.
3. The key fields together must uniquely identify each row in the table. A possible key is FlightDate and FlightSeqNumber combined. Thus, the first two flights of 10 Jan 2014 are :
01/10/2014 – 1
01/10/2014 – 2
If a user enters 01/10/2014 - 1 a second time, the database will issue an error message stating you are trying to enter a duplicate key.
Take a print screen of
the table you created, design view. Paste that in yourlastname_lab1.doc that
you will turn in.
c) Once you create the table structure, switch to the Datasheet view and add several rows of data. Try to duplicate the data in a key: if you use the date and flight sequence number as the key, and you enter 01/10/2014 - 1 twice you should get an error message.
Take a print screen of
the error message you get when trying to add 2 rows to the table with the same
value for the key. Paste that in a document yourlastname_lab1.doc that you will
turn in.
d) Likewise, you should get an error message for entering an improper EventType with an explanation of correct inputs.
Take a print screen of
the error message you get when trying to add a row to the table with the
incorrect value for EventType. Paste that in
yourlastname_lab1.doc that you will turn in.
Part 2: Data-Entry Forms
Forms provide the most flexible way for viewing, adding, editing, and deleting your data. The user of your database should not see the raw table data or understand how to enter date into a table. The data-entry form should be easy and intuitive for the user. The tutorial provides an overview of forms. You can use the form design view or the wizard to create forms.
Part 2 requires you to build a simple data entry form called ViewEditFlights for flight events. The easiest way to do this is to use the Create - Form options from the menu, then select View - Design View to have the "design menu" show up. Use the "button" option to add command and navigation buttons to your form. Be sure to add "go to previous", "go to next", "add new record", "save record", "delete record" buttons to your form. Add some data using the input form and test your command buttons. Below is an example of a data entry form for a flight schedule program
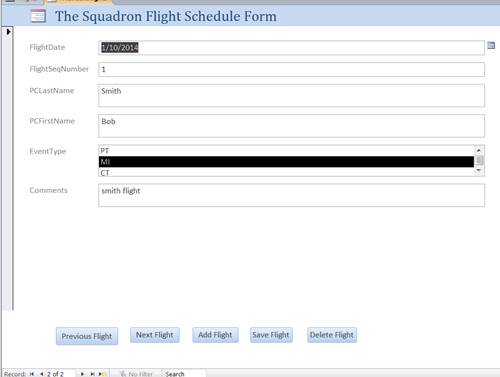
Take a print screen of
the form you created. Paste that in yourlastname_lab1.doc that you will turn
in.
Part 3: Queries – Design View
The primary purpose of any database is to store and extract information. Using database tools you can easily obtain information to meet virtually any criteria you specify. A query is a question you ask about the information stored in your tables. There are six types of Access queries, but now you will work with just one – the “select query”. To create a query, click on “Create->Query Design”
Create queries that ask the following. If you do not have much data in your database go ahead and add some additional rows. Save each of the queries for review by your instructor using the name given Query1, Query2, etc. After writing the query, execute it (! Run in the toolbar) to see the results of executing the query.
- Query1: List all the data in the flight schedule table.
- Query2: List only the flight date, flight sequence number, pc last name, takeoff time, landing time, and event type for all flights flown by a plane commander with last name "Doe" (you can replace “Doe” with a value based on your data, so the query returns some results).
- Query3: List the first name, last name, and flight date of all plane commanders who flew before 2/2/2014 (you can change 2/2/2014 with another value based on your data, so the query does not return all the records in the initial table, but does return some rows).
- Extra Credit: Query4: List the first name, flight date and flight sequence number for all flights flown by a plane commander whose first name begins with ‘M’.
Note that on the flight schedule there could be a field for “total time” for the flight. This information is not recorded in the table. In fact, computed data should never be stored in the database. (Why?)
Take a print screen of
each query you created, in Design view
(so I can see the query). Paste that in yourlastname_lab1.doc that you will
turn in.
Part 4. Report
Reports provide a flexible way for viewing and printing summarized information. They enable you to display information with the desired level of detail while letting you view or print your information in almost any format. Reports can range from the very simple to build to fairly complex. We will focus on the simple. The Reports are similar to forms except they display results of a query or the entire data from a table.
Create a “flight schedule” report named PersonalizedFlightReport similar with the one shown below, using the “Query2” in Part 3 as the basis of the report (it will show in a nice format the results of executing that query). You do not have to follow the same format as below. A simple listing of all the results of the query is enough. You can use either the design view or the wizard view to create the report.
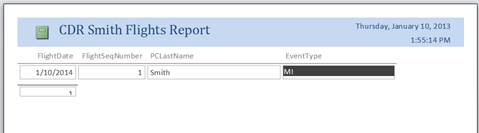
Take a print screen of
the report you created. Paste that in yourlastname_lab1.doc that you will turn
in.
Part 5: SwitchBoard
A form that is used to navigate to other forms and reports in the database is referred to as a switchboard. In most cases, you design a switchboard to open instead of the Database window (similar with the main page of a web site). On the switchboard you place controls for only those objects to which you want the user to have access. The screenshot below is a simple switchboard.
Add a simple switchboard called SwitchboardFlighs to your database that will allow the user access to the ViewEditFlights form you created in Part 2 and the PersonalizedFlightReport you created in part 4. Create the switchboard as a simple form (start with a blank form and add command buttons). Then set the switchboard to open automatically when the user selects the database. You accomplish this selecting from the main menu File->Options->Current Database and setting Display Form field to SwitchboardFlights.

Take a print screen of
the switchboard you created. Paste that in yourlastname_lab1.doc that you will
turn in.
Part 6: SQL
In Access, click on Create – Design Query, switch to “SQL View” and write the SQL statement to accomplish the following. Save each statement as Query x, as indicated below:
a) Query 5: Create a table named Courses:
Courses(Cid, Cname, Cdept, CreditHours). Choose the appropriate data type for each column (integer or varchar(100) ) and declare Cid as the primary key for the table. Save the query as Query 5 and run the query. Was the table created in Access? Add a few data rows to the table (using the Datasheet View for the table)
b) Query 6: List all courses in the Courses table.
c) Query 7: List the course id and name of all the courses in the Computer Science or Mathematics department (you can change Computer Science with whatever fits your data, so your query does return some answers)
d) Query 8: List the course id, course name, and credit hours of all courses, sorted in ascending order by credit hours and for those with the same credit hours, sorted in descending order by course name
e) Query 9: List all the information about the courses whose name starts with “A”
Take a print screen of
each query you created, in SQL view (so I can see the SQL query). Paste that in
yourlastname_lab1.doc that you will turn in. Or you can just copy-past all of
the SQL queries in yourlastname_lab1.doc.
Turn in:
Electronic (due BEFORE 2359 on January 20, 2014):
- Upload the database you created, named yourlastname_lab1.accdb to Lab 1 assignment on Blackboard.
Hard-copies (due BEFORE start of lab on January 21, 2014):
- The completed assignment coversheet. Your comments will help us improve the course.
- A hard-copy of yourlastname_lab1.doc that contains:
- A print screen of the table created in Part 1, design view (not the Datasheet view).
- A print screen of the error message you get when trying to add a row to the table with a duplicate key value (same FlightDate and FlightSeqNumber as an existing row)
- A print screen of the error message you get when trying to add a row to the table with the incorrect value for EventType
- A print screen of the form created in Part 2.
- A print screen for each query created in Part 3, design view (so I can see the query, not the results of executing the query)
- A print screen of the report created in Part 4.
- A print screen of the switchboard created in Part 5.
- A print screen of each query in Part 6, SQL view (so I can see the code) (or just copy-paste all the SQL statements in your document)