In today's lab, you are going to be writing programs to draw on and change images.
We will use a library called OpenCV to do the hard work for us. This library
(called cv2 in Python) contains many sophisticated functions to
deal with images, and we will use it for multiple labs in this class.
Using a library is great because we can let the library authors work out the details on how to do each kind of manipulation, and we can just worry about what we want to have happen. But it's also difficult, because we have to learn how to use the right function names to do what we want. Think of it like driving an alien spaceship: you know the spaceship is awesomely powerful, but there will be some tough trial-and-error to figure out how the controls work.
Start the lab by making a new folder for this lab within your main si286
folder. Call your new folder something like lab02 (avoid putting any spaces in
your file or folder names to make things a little easier on the command line.)
Remember last week when you installed lots of things and had to wait for everything to download? Now that the initial setup is behind us, getting cool new libraries is easier. Run these install commands in order to install OpenCV:
sudo apt update
sudo apt install python3-opencv
Let's check if that worked! First off, run XMing on Windows. This lets us popup graphical interfaces from Python. Now just download this example program called turing.py (save it as turing.py) (using right click / "save as") and save it to your lab02 folder. Then try running that program from the command line. Remember how to change directories in a terminal?
cd lab02
python3 turing.py
If it works, it should pop up a video of a randomly-generated image that's meant
to look like an electron microscope image of a single-celled organism. Feel free to
glance over the code in turing.py to get a little idea of what OpenCV is capable
of. You aren't ready to understand it all, but notice that even making a complicated-looking video like this does not take very many lines of code!
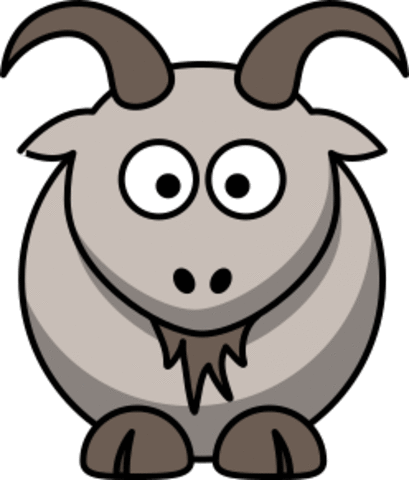
We will start the lab by drawing on this picture of a goat. Download the goat.png
file by right-clicking the image, selecting "Save image as...", and then navigating to the
lab02 folder you just created.
Now open Atom and create a new Python program. Save it as mygoat.py in your
lab 2 folder, and first load our cool new library:
import cv2Remember last week we imported EasyGUI? Now we're using OpenCV which is on your system as cv2. This import now makes available a variable called cv2 which is an object that contains all the functions we'll use.
Copy the following into your new file:
import cv2

source_file = 'goat.png'
image = cv2.imread(source_file)

cv2.imshow('The Goat', image)
cv2.waitKey(0)
cv2.destroyAllWindows()
Here is a line-by-line description of what this program is doing:
import cv2 —
tells Python we want to use the OpenCV library.
source_file = 'goat.png' —
saves the name of the image file we want to open as a string variable.
image = cv2.imread(source_file) —
opens the image file and saves it as an OpenCV image with variable name image
cv2.imshow('The Goat', image) —
pops up a window to display the image. 'The Goat' is a string
that will go in the window title bar.
cv2.waitKey(0) —
pauses the program until you press any key.
cv2.destroyAllWindows() —
clears away the pop-up window.
This part should be familiar from last week's lab. Save your program as mygoat.py
in Atom. Then open your Ubuntu and enter the following commands to go to your lab 2 folder
and look at what files are there.
(Note, cd means "change directory" and
ls means "list contents of this directory".)
mXXXXXX:/mnt/c/Users/mXXXXXX/Desktop/si286$ cd lab02
mXXXXXX:/mnt/c/Users/mXXXXXX/Desktop/si286/lab02$ ls
goat.png  mygoat.py
Now type python3 mygoat.py to run your
program. You should see a window pop-up with the picture of the goat. Type any key to close the
window.
Now we will start adding some changes to the mygoat.py program you started on.
Every computer image is made up of many, many tiny dots called pixels, arranged in a rectanglar grid of rows and columns. Each pixel has a certain color. It may look like there are curves and diagonal lines, but that's just because the pixels are very small.
Add the following line to your goat program, before the line that calls cm2.imshow:
print(image.shape)When you run the program now, it will print to your terminal screen (480, 409, 3).
That means this image has 480 rows and 409 columns
of pixels.
Knowing the dimensions is important for working with any image, as the pixel numbers are your way
to "navigate" the image in code.
In OpenCV, rows start from 0 at the top moving down, and columns start from 0 at the left
moving right.
The last number 3 in the shape
has to do with the color. By default OpenCV images represent colors
as three numbers, for the amounts of blue, green, and red respectively. This is called RGB coloring,
even though in OpenCV it's really backwards as BGR. Each of the three color components is a number from
0 up to 255. So for example (0, 255, 0) would represent a totally green pixel.
A more complicated color
would be (0, 68, 102) for a chocolatey color made from a little green and some red.
You can use square brackets with the row and column index to access the color of any pixel in the image. Add these two lines to your program to show you the colors of two specific pixel locations. Make sure you understand what the pixel locations mean here. What is the color of a totally white pixel?
print("Under the top-right horn:", image[50, 350])
print("Inside the goatee", image[350, 205])You can change the color of an individual pixel by using the square-brackets
with an assignment operator =. Add the following lines to your program:
blue = (255, 0, 0)
image[181, 148] = blue
This creates a tiny blue speck in the left eye, just left of the pupil, which is at row 181 and column 148. Can you see it? It's very small! Try making the speck bigger by adding a few similar lines of code with different nearby coordinates.
Changing pixel colors one-at-a-time can get pretty annoying. Fortunately, OpenCV has many built-in functions to draw entire shapes. These two lines will draw a gold earring on our goat:
gold = (0, 215, 255)
cv2.circle(image, (380, 160), 10, gold, 3)
Let's break down the arguments to the cv2.circle function:
image —
The image we are drawing a circle on
(380, 160) —
The coordinates where it should be. This means column 380 and row 160.
Yes, it's backwards from before!! When you call OpenCV functions, the
column (x-coordinate) comes first.
10 —
The radius of the circle, in pixels.
gold —
The color. This is just the variable name that we made on the line before.
3 —
The thickness of the circle line. If you put -1, it would make
the circle be completely filled in.
You can always get a synopsis of how a function works by calling help from the
command-line python interpreter. So you could get information like what we just learned on drawing
circles by running, from the command line:
mXXXXXX:/mnt/c/Users/mXXXXXX/Desktop/si286/lab02$ python3
Python 3.6.9 (default, Nov  7 2019, 10:44:02)
[GCC 8.3.0] on linux
Type "help", "copyright", "credits" or "license" for more information.
>>> import cv2
>>> help(cv2.circle)
Make the goat your own! Add code to your program to draw at least two more elements. Here are some suggestions for functions to use:
cv2.line()cv2.ellipse()cv2.putText()cv2.rectangle()cv2.arrowedLine()cv2.drawMarker()Use the help tool within the Python console or read the online documentation for how to use these functions.
Required: mygoat.py which displays the goat with an earring and two other different shape elements.
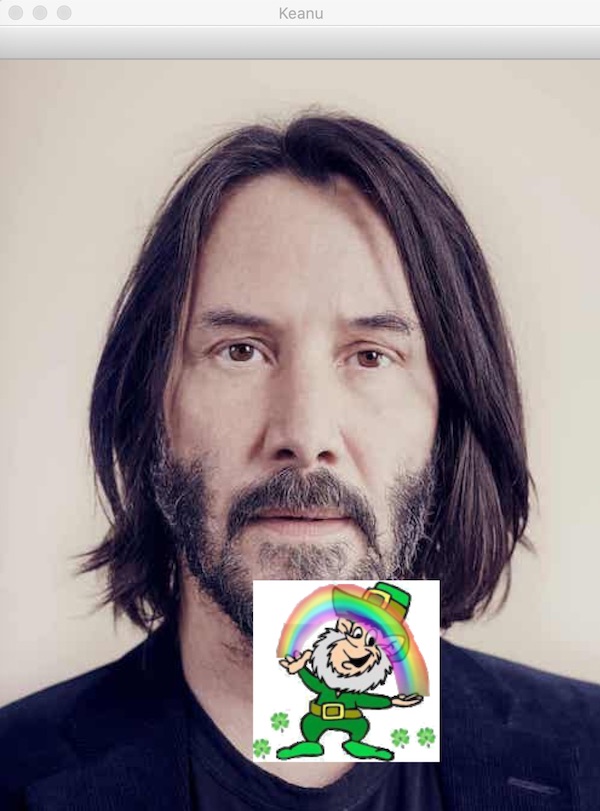
For this part of the lab, you will start with your very own picture (either something from your personal collection, or something you get from the web), and then display two images together.
Find a picture that you would like to play with and copy it to your
lab02 folder. Yes, pictures of Keanu Reeves are acceptable. It will probably have a filename that ends in
.jpg, .gif, or .png. You can quickly use Microsoft Paint to shrink your picture if it is too big to show on the screen (resize button top left).
Then make a new Python program called
multiple.py which opens this image file and displays it
using OpenCV. (This should be just a few lines of code that are very
similar to some parts of your goat program!)
Just below is a small picture of a leprechaun on a white background
that I copied from Wikipedia. Right-click and save it to your lab02 folder as
leprechaun.png:

Because this is a small image (154 by 150 pixels to be exact!), it should be able to fit within your chosen image. The idea is to insert the leprechaun somewhere onto your original scene like the Keanu Reeves picture at the start of this lab.
In code, the way we do this is by overwriting pixel values for some 154x150 rectangular
region on your original image with the pixel values for the leprechaun. You must add lines to your multiple.py program that do the following:
leprechaun.pngThe trickiest part here is the last step, overwriting some rectangle in the original image with the leprechaun.
For example, let's say your original image is in the variable called background, and you want
to insert the leprechaun at offset (30,200).
OpenCV makes this easy for you, letting you index an entire rectangle of an image by using ranges within the square brackets. A range in Python is a list of starting and ending indexes separated by a colon. So, all of the lines of my previous example could be accomplished in just one step by writing
background[30:180, 200:354] = leprechaunYou will get more used to ranges when you learn for loops next week. For now, just keep the following in mind.
3:8 means indices 3, 4, 5, 6, 7.
n", where
n is a variable in your program, you could write the range n:n+30.
To complete this step, augment your multiple.py program so that it reads in your original image,
and reads in the leprechaun image (or another small image of your choice), places the leprechaun at some offset
in the larger image, and displays that. (Pick an offset that's different than the example above. Try to put the
leprechaun somewhere interesting in your image!)
Now leprechauns are no fun unless they are moving around, right? For this step, you will make a small animation which consists of a few images, or frames.
Specifically, your animation should start with your background image, then show that with the leprechaun inserted somewhere (like the last step), and then have the leprechaun "move" somewhere else in the image. Of course there is no real movement; all this means is that you make another image where the leprechaun is inserted at a different offset.
To do the animation part, you change the argument to the cv2.waitKey function for the number
of milliseconds you want to pause between frames. I suggest starting with 1 second between frames, which
is 1000 milliseconds. So your multiple.py program for this part should work kind of like this:
  # ... read in your image ...
cv2.imshow('my animation', image)
cv2.waitKey(1000)
# ... read in the leprechaun and insert it somewhere ...
cv2.imshow('my animation', image)
cv2.waitKey(1000)
# ... insert the leprechaun somewhere else for "movement" ...
cv2.imshow('my animation', image)
cv2.waitKey(1000)
# ... repeat for more movement! ...
cv2.destroyAllWindows()
One last tip: when you go to create the third frame where the leprechaun moves to a second location, you can't just replace a rectangle in the image at that point. Why not? Because you already inserted the leprechaun once - now there will be two leprechauns!
You need to save the original image. Then make a copy of it for drawing the leprechaun on it. OpenCV provides us the image.copy() function. Calling .copy()
on any image variable creates a complete copy. If you start by making a copy of
your background image before drawing on the leprechaun, then you can go back to that original version and use it again to place the leprechaun in a different location.
Required: (multiple.py)
Now that you understand the basics of drawing and combining images, make your animation more interesting! Can you tell a story with a few frames of animation? You could include some other small image besides the leprechaun. Perhaps a face, or another creature, or a spaceship? You could also use some of what you learned in the first part of the lab to draw shapes on some frames, or add some text.
No matter what you do, be sure that your total animation doesn't last longer than 10 seconds, but that each frame lasts long enough so that it can be enjoyed and appreciated.
Login to our submit system and submit the following files:
mygoat.pymultiple.pygoat.png, leprechaun.png,
yourimage.jpg, etc.