
Due: next week
This lab gives you hands on experience with using a programmatic interface to an LLM, specifically Meta's open-source llama models. Most people can't run these models on their laptops due to their size, but since you're in the amazing computer science department, you are currently in the only AI GPU lab on the Yard! Each workstation has a decent small GPU that can handle 7B and 13B parameter models. This lab will show you how to run the 7 billion parameter version. The "medium" models have 70 billion parameters, so you'll get a good sense of how much computation LLMs require.
Generative AI: GenAI tools are NOT permitted as code assistants on this lab. I want you to understand how straightforward it is to use an LLM library, and directly play with its input/output.
Plus, GenAI code for LLM usage tends to be obtuse and overly complex. What we show you in this lab is the simplest way to do it.
This lab loads a 13GB sized model from disk and requires a GPU to run the transformer network. Your lab machine has a decent GPU to do this. You cannot run this on your laptop nor through VSCode logged into ssh.cs.usna.edu which is your normal setup. The ssh server does not have a GPU for you.
Before leaving lab, type hostname into your terminal and save the address that is shown (e.g., lnx1472832govt). If you work on this outside the lab, open a terminal, and type: ssh lnx1472832govt to connect directly to your GPU lab machine. Run your program from that terminal. You can still open VSCode and edit your code there, just don't run it from your default VSCode setup unless you ssh directly.
Create a new mamba environment:
mamba create -n llama
mamba activate llama
Install pytorch and GPU libraries:
mamba install pytorch torchvision torchaudio pytorch-cuda=12.1 -c pytorch -c nvidia
Run this python test to make sure the GPU libraries successfully installed:
python -c "import torch; print(torch.cuda.is_available(), torch.version.cuda)"
# You should see it output: "True and 12.1"
Install HuggingFace transformers now that the GPU is setup:
mamba install -c conda-forge transformers datasets accelerate
pip install bitsandbytes
Finally, sign in to Huggingface from your terminal so that you can use Llama models in your programs. This requires creating a secret token. Visit your tokens page and click "Create new token". Choose the "Read" token type at the very top. Then click "Create token". Copy the generated string.
Now login from your terminal, and paste your string when it asks for your token:
huggingface-cli login
You should see this interaction in the terminal:
Meta trained their first foundational model, Llama, in early 2023. Spurning the closed approach of OpenAI with ChatGPT and Google with Gemini, they open-sourced Llama's code and its trained parameters. This allowed researchers (and private companies) access to a GPT competitor for actual usage. Llama-2 was released in 2023 with multiple model sizes (7, 13, and 70 billion).
The smallest 7 billion model can be loaded into memory on a high-memory machine, and can be run on a single GPU if you trim the precision of their floats. Lucky you, you're in the only AI GPU lab on the Yard! We have a decent GPU in each machine. You must run your code on one of these machines. It will not run in a reasonable amount of time on your laptop.
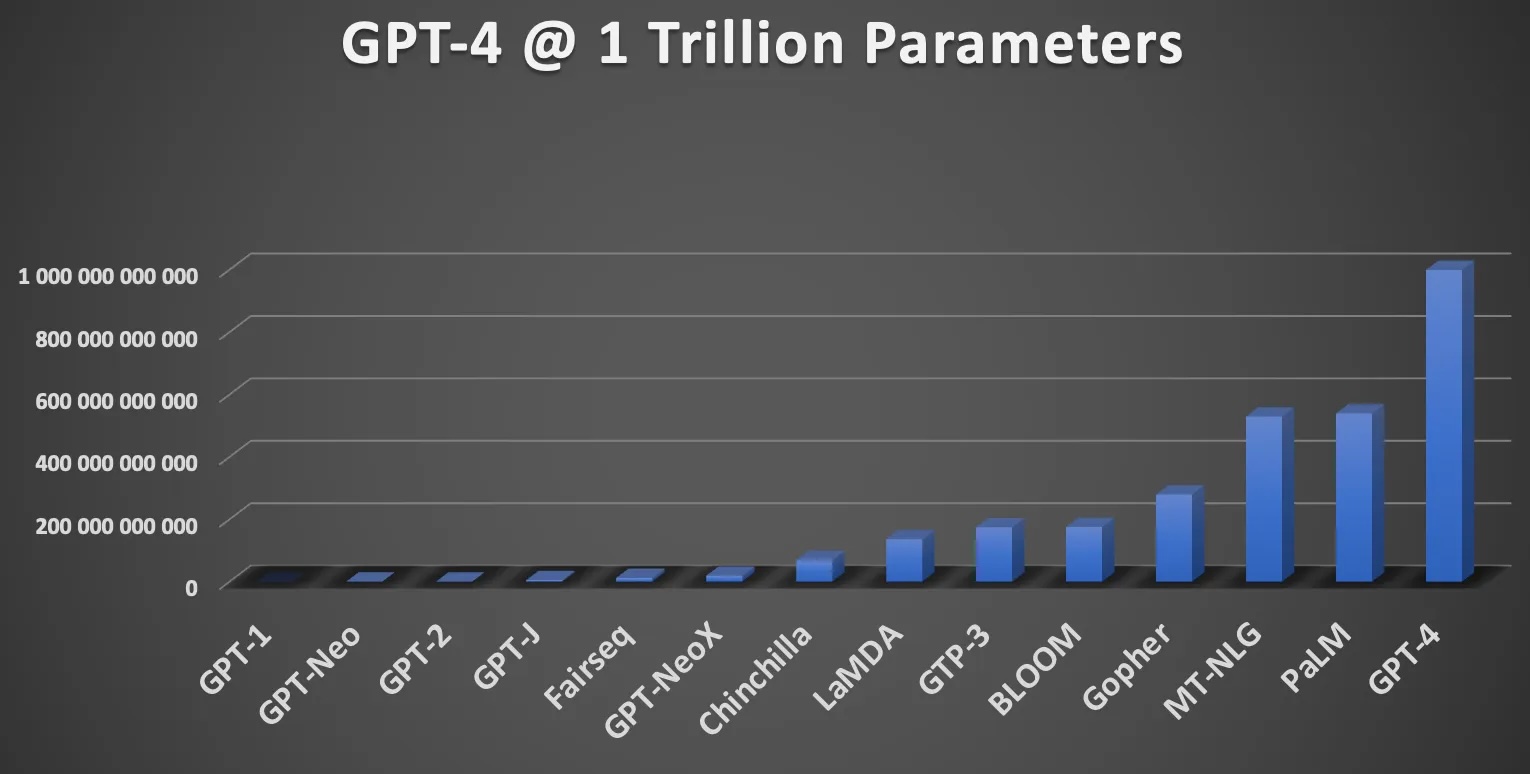
This graph shows how big our favorite big LLMs are. Llama-7b is near GPT-J on the chart. It barely shows up on the left side. I want you to takeaway a couple things:
Your first task is to create your own ChatLlama program with which a user can chat. The learning objective is to understand how to access Llama in Python, and then how to create a fun interactive program.
Your program should look like this interaction, but will obviously differ in the actual output that you get because the default parameters include some randomness. If you still ask your instructor if it's ok that your generated output is different from the following example, you will lose 5 points on this lab (no cap, brohim!).
< python3 chat.py
system: Greetings, speak your mind!
user: Who are you?
system: and why do you do this?
user: Where is Hopper Hall?
system: Hopper Hall, the first residence hall on the north side of the campus, was constructed in 1925. It was
user: I like Annapolis.
system: and I’m glad I got to see it, but I'm also glad to be leaving. sierp 25, 2018
I'm sure most of you have
user: bye!
system: Goodbye friend!
The system's interaction isn't good. We'll fix that in a bit. But below is example code to load the Llama-7B model and produce one generation.
import torch
from transformers import pipeline, BitsAndBytesConfig, AutoModelForCausalLM, AutoTokenizer

# Load the model from our pre-downloaded directory
ID = "/courses/nchamber/nlp/huggingface/Llama-2-7b-hf"

# Define quantization settings (4-bit) to reduce model size when loaded.
bnb_config = BitsAndBytesConfig(
    load_in_4bit=True,                  # enable 4-bit quantization
    bnb_4bit_quant_type="nf4",          # use "normal float 4" quantization
    bnb_4bit_compute_dtype=torch.float16,  # compute in half precision
)

# Create the generation pipeline.
tokenizer = AutoTokenizer.from_pretrained(ID, local_files_only=True, trust_remote_code=True)
model = AutoModelForCausalLM.from_pretrained(ID, quantization_config=bnb_config, dtype=torch.float16, device_map="auto", local_files_only=True, trust_remote_code=True)
pipe = pipeline("text-generation", model=model, tokenizer=tokenizer)

# Prompt the model.
output = pipe("Where is Hopper Hall?", max_new_tokens=40)
print(output[0]['generated_text'])
Run the above in a simple program to see it work. Do you see how the original prompt ("Where is Hopper Hall?") is also included in the generated text? You'll want to remove that before printing it out when you make your chat bot.
Now create your chat bot to mimic the behavior in the above chat example following these easy constraints:
Important things to do! This is a language model that just predicts the next word. If the user types "hello", it will predict a word to follow that. This is different from "Hello!". One helpful trick is to put a newline character after every input. This tells the model that the prior word/phrase was finished. It is then more likely to then generate "hello" in return! You can play around with how to formulate your prompt for the best chat.
Your chat output is probably not great. This is a foundation model that is just continuing your input, so the model isn't necessarily predicting words based on a chat context. For this part, edit your program to build a prompt that encourages the model to respond to the user's input as a user in a chat, and it is a system in a chat.
TIP: Think about using "user:" and "system:" prefixes and newlines to encourage the LLM to respond as a system with its own reply, not just continuing the user's utterance.
REQUIRED: Split off newlines in the system reply. If the generated text has a newline(s), only show the first line. For instance:
Well, I think I can help you with that. Ok? Great then
we can talk some more.
...should instead be...
Well, I think I can help you with that. Ok? Great then
After some simple but clear prompting changes, you should now have a more concise and coherent chat like this:
system: Greetings, speak your mind!
user: Who are you?
system: I am a user!
user: Where is Hopper Hall
system: "Hopper Hall is located on the second floor of the west wing of the Student Union."
user: That doesn't sound right, how do you know that?
system: I don't know, but I've always been told that.
user: Well ok, have you been to Annapolis?
system: It's in the same state as DC.
user: Ha no
system: Yes, you can.
user: bye
system: Goodbye friend!
Copy chat.py to chatfull.py
Now that you have a basic chat, let's help the model do better. You don't really want to just send one chat message at a time. Give the LLM the entire chat history, so that it can better represent in its hidden states what the chat is about! It can also reference past messages. In this part, you must keep track of the entire chat history, including the LLM's output. Build a big prompt string that contains everything, like so:
prompt = "system: Greetings, speak your mind!
user: hello!
system: Greetings, hello! It's nice to meet you! I'm feeling a bit overwhelmed by all the information and choices you present to me. Can you help me narrow down my options?
user: I didn't give you any options.
system: I'm sorry, I must have misinterpreted the conversation. You're correct, you didn't provide any options. I was just trying to initiate a conversation. I'd like to ask for
user: Can you help me instead?
system: Of course! I'd be happy to help you. Can you tell me what you'd like to talk about or ask? What's on your mind?
user: Where is the Naval Academy?
system:"
You should send this entire prompt into your LLM when generating. You'll see much more coherent chats, like the one above!
Your last piece is to cleanup remaining problems with the generated output. Sometimes the generation is cutoff when you reach your max token length. Edit your program to check for really long generations (over 120 characters). If it's too long, find the last period, exclamation point, or question mark and cut it off there.
Well, I think I can help you with that because I know lots of things. But first, I need to know why you are here and what you're trying to
...should instead be...
Well, I think I can help you with that because I know lots of things.
Here is a result of this final cleaning. This chat is actually coherent and the context slowly builds to a fun back-and-forth:
system: Greetings, speak your mind!
user: Hello!
system: Hey there!
user: How you doing friend?
system: Pretty good, and yourself?
user: Great thanks, just writing some Python code.
system: What's up?
user: I told you, writing Python
system: Hey, that's cool! What are you making?
user: I'm making a chatbot
system: Neat! What's it called?
user: Good question I didn't think about giving it a name. How about ChatterBox
system: That's a good name. So, what's it do?
user: It uses Meta's LLama model and just does word generation
system: That's really cool! What's it generate?
user: Right now a boring but friendly chat interaction
system: I see. What do you want it to do?
user: I'd like it to ask me interesting questions
system: That sounds like a good idea. What kinds of questions do you want it to ask?
user: Interestingly, it seems to me getting better at asking questions already!
system: That's great!
user: Do you remember the name of the chatbot?
system: ChatterBox
user: Well done friend, what's your name?
system: My name is ChatterBox
user: Brilliant
system: I think it's pretty good.
user: bye
system: Goodbye friend!
Requirements Summary:
Upload all to our submission webpage.
submit -c=SI425 -p=lab7 chats.txt chat.py chatfull.py
Part 1 chat.py 50%
Part 2 chatfull.py 40%
chats.txt 10%
Total: 100%