“Hello World” with the Microsoft
Visual STUDIO .NET "IDE" by CDR McKenna
Preliminaries We will use Microsoft Visual Studio .NET to create, compile and execute your C++ programs. Microsoft Visual Studio .NET (abbreviated as VS.NET) is an Integrated Development Environment (IDE) which contains:
- an editor for typing in and modifying your program
- a compiler for converting your C++ program into machine language
- a linker which combines your object code with other sections of object code that might be required, resulting in an executable program.
- a debugger for locating errors
Solutions and Projects.
Our C++ program (source code) will be entered as a file. This is the actual file that you will type using the editor. Other files will be used along with our source code to enable the IDE to execute the program. For example, another type of file that may make up your project is a "header" file, or "include" file. An "include" file allows you to use additional source code that you or others have written. They comprise a library of helpful tools -- for example, they can provide input/output capabilities, standard math functions (like cosine, or finding the square-root), among others. In fact, they are often called standard library files. You reference a "header" file by "including" it into your source file. The only file you need to worry about today is the source file you type.
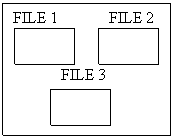
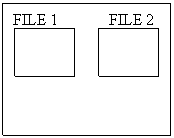
The complete collection of files needed to run our program is termed a project. So, a project is the collection of files that make up the program (or application) that you are developing. The files for our program are grouped together in a project just as, in general, you would tend to group related files into a folder, and these related files are combined together by VS.NET to create a single executable program.
Just as files are collected into projects, projects, in turn, are collected into solutions. So, a solution will hold one or more projects, and each project will hold a set of files, one of which will be a C++ source code file. In this class, your “solutions” will likely involve only one project composed of at least one file.
PROJECT
1 PROJECT
2
SOLUTIONS
In this course, we will place each project in ids our workspace, so for this course,
Using
Microsoft Visual STUDIO .NET
Let’s get down to business and learn how to code, compile, link, and execute a simple program. A program the just outputs “Hello World” is the traditional first program.
CS DEPARTMENT VISUAL STUDIO .NET C++ HELLO WORLD
|
STEP |
INFORMATION |
|
1 |
Open up Visual
Studio .NET |
|
|
|
|
2 |
Select Create a New
Project |
|
|
|
|
3 |
Select Visual C++ Project and the Win32
Project template. Give a name to your project (HelloWorld for
example). Recommend you click on Browse, double click on the network
drive labeled: m05xxxx on
‘cs-students-DC1…’.
You should see two folders labeled m05xxxx Docs and SI204. Double click on SI204 and create a folder
called Labs. Click OK.
The project name (HelloWorld) will be
the name of the folder in your Labs
folder. Click the OK button. |
|
|
|
|
4 |
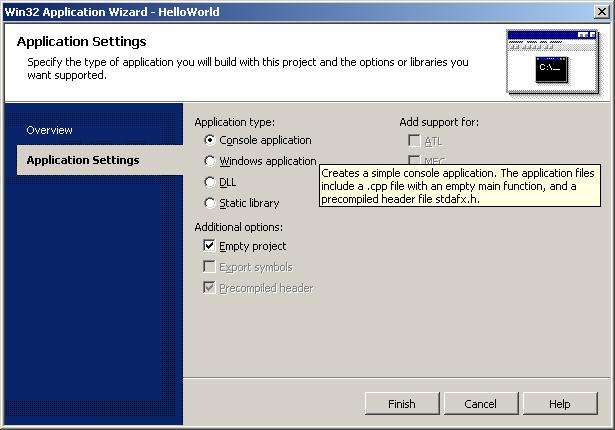
Click on the Application Settings tab and under Application
type: choose Console Application, and under Additional
options: choose Empty project. Finally, click on the Finish
button. |
|
|
|
|
5 |
You have created a solution containing one project named HelloWorld. The project contains no files. We will now add a file to the project that
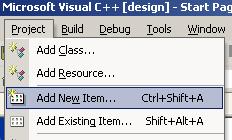
will contain the program source code. Select the Project Menu and then select add
new item . |
|
|
|
|
6 |
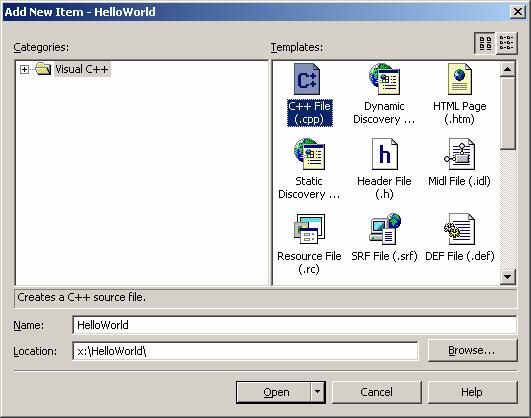
Select the Visual C++
folder and the C++ File (.cpp) option. Assign a name to your new source file. It is typical to give your source file the
same name as the project. |
|
|
|


|
7 |
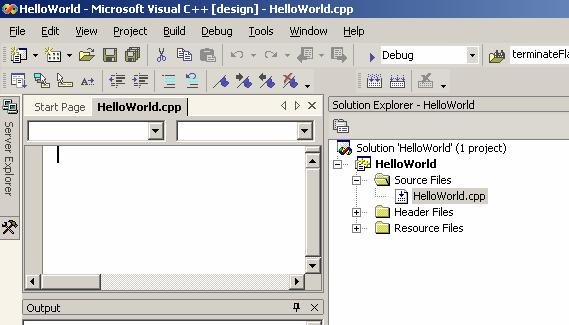
The next screen will display an empty Visual C++ window for the application development environment. Let’s take a moment to examine the parts of the IDE. The default workspace is comprised of three parts The file view, which provides a "bird's eye" view of all the files that your programming project needs to run. The editor window, in which you can type in your source code. The output window, which will display messages to you as the programmer whenever you compile or build or debug a project. The editor uses something called syntax coloring to make it easier for you to read the programs you have written. Syntax coloring highlights the different program elements such as comments, keywords, numbers, and variables. This allows you to easily identify elements of your source code and find common syntax mistakes quickly. For example, the comments are in green. If you see your source code is green then you likely forgot to close a comment block. Additionally, the IDE attempts to help in other ways such as by providing automatic indenting, aligning braces, and so forth. |
||
|
|
solution project file |
||
|
8 |
Create your main
and add your include statements. If you do not understand what you are
typing DO NOT BE CONCERNED. You
instructor will soon explain required and essential elements of C++
programs. Type the code exactly as shown
below. When done, save your file: file
=> save (or select the save
icon) |
||
|
|
|

|
9 |
Compile. If
you want the programs you write to actually do something then you must
compile them (turn source code into machine language). Converting high-level C++ source code into
machine language is very complex, but compiler vendors are solving this
problem for you. To compile your
program, select Build =>
Build HelloWorld (or click
the build button on the toolbar). If
your compile is successful you output window will give the following message: Build:
1 succeeded, 0 failed, 0 skipped If you do not see
this message then get assistance from the instructor. If there are errors, they will be listed in
the output window. Tips for
deciphering error messages are given at the end of this tutorial. |
|
10 |
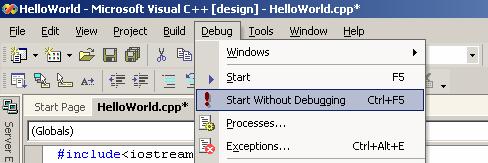
Link and Run!
Once you successfully compiled the program (no syntax errors) then you
are ready to run the program. Select Debug => Start Without
Debugging. The linker will import required code and place it into your compiled
program creating an executable file.
The program will automatically execute and you should see the
following output window. |
|
|
|
|
|
|

Now, minimize the VS.NET window. Double-click on My Computer and go to your lab folder. Inside you will see a folder called HelloWorld. Open it. There is a file named HelloWorld.cpp – it is your source code file. Note the size of the file (~ 1 kb). Now, double-click on the Debug folder. The file titled HelloWorld contains the executable file—that is, your program’s object code combined with all of the other necessary object code to run your program. Note the size (~450 kb)!!