Part 0: Lab Ground Rules
- Our labs are available for your use many hours during
the day, as well as after hours.
- No eating is allowed in the lab. Drinks are allowed only
in closeable containers (so soda cans are not permitted).
- Be courteous and log off the computer when you leave the lab.
- Do not attempt to physically alter any equipment in the lab.
- Do NOT reboot the machines. If you really think a reboot is needed, talk to your instructor or to the sysadmin, Mrs. Bonnie Lucas.
Part 1: The Computing Environment
Login: Ubuntu
- Your username and password are the same as those of
your NADN account. Enter your username and password to log
on.
Note: If you're reading this in lab, you've probably
already done this step!
Your Unix Account
- You already have an account on the CS Department's Unix
machines, which are actually running GNU/Linux.
- The Unix environment is quite different than Windows and
will take some getting used to. I strongly recommend
doing all of your programming work on the Unix machines
so that you comfortable with it by the 6-week exam. A quick
reference guide to common Unix commands is provided on the
Resources page.
- You are always welcome to work in the Unix labs
throughout the semester; however you must also get comfortable
with some other option that will work from your room. Your two
primary options are:
- Use VMware to emulate Ubuntu Linux on your Windows machine (highly recommended).
- Use the Unix lab machines remotely by connecting to them
from your Bancroft machine. To do this, you will use the
program "PuTTy". This is not recommended, but if you really
must, ask your instructor about how to use something like
'Xming' to make it work better.
See the Resources section of the IC210 home page for info on how to set these up.
Part 2: Your First Program
We will be using the Unix environment to create, compile&link and
execute C++ programs. First, you must choose a text editor to create
your first C++ program. Sounds easy, right? Wrong! Your
choice of text editor will mark you for life. Choose wisely!
- emacs - feature-rich text editor.
← Dr. Brown's recommended choice!
- vi/vim/gvim -
lightweight and powerful text editor.
← Drs. Roche and Taylor's recommended choice!
- atom -
a new pretty-to-look-at editor (written in Javascript)
← Favorite of those distracted by pretty lights.
- gedit - similar to Windows
Notepad.
← Feels nice and comfortable, like an
old sweatshirt. Do you want to program with a sweatshirt?

Our C++ program (source code) will be entered as a
file. This is the actual file that you will type
using the editor. Other files will be used along with your
source code to enable the execution of your program. For
example, another type of file that may make up your project
is a "header" file, or "include" file. An "include" file
allows you to use additional source code that you or others
have written. They comprise a library of helpful tools -- for
example, they can provide input/output capabilities, standard
math functions (like cosine, or finding the square-root),
among others. In fact, they are often called standard library
files. You reference a "header" file by "including" it into
your source file. You will include a library file today that
provides basic input and output services for your program
(details to follow).
The complete collection of files needed to run our program
is termed a project. So, a project is the collection
of files that make up the program (or application) that you
are developing.
Step-by-step instructions to creating the "HELLO
WORLD" program
STEP
|
INFORMATION
|
| 0 |
Directory setup:
- Open a terminal by selecting the
Terminal application (to do so, look at the
"Launch Bar" on the left side of your screen. Click on
the top bottom (text saying "Dash Home" appears when you
hover over this), wait for a box to appear, and type
"Terminal". Or, if the Terminal icon already appears
lower down in the Launch Bar, just click on that).
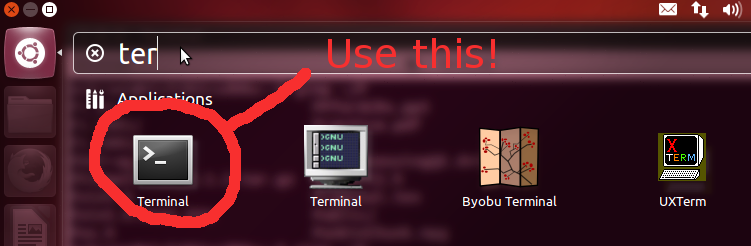
This
will open a window where you can type in Linux commands.
USEFUL SHORTCUT: Pressing Ctrl+Alt+T will also open a terminal.
- Make a new directory (what Windows calls a "folder")
to hold your work. You use the "mkdir" command for
this. In the terminal that you just opened, type
exactly this:
mkdir ic210
- "Permissions" control who is allowed to view,
modify, and use your files. Later you'll learn the
details of this, but for now we just want to ensure
that the permissions of your directory allow only you
to use your files. The "chmod" (change file mode)
command is used for this.
First, you will change the permissions mode as
follows: for users that belong to the same group(g) as
this file or directory, you want to subtract
permissions (a minus sign) for read(r), write(w), and
execute(x). So enter this:
chmod g-rwx
		  ic210
Next, you will do the same thing, but also for all
"other"(o) users (all users that don't either own the
file or belong to the same group). Enter this:
chmod o-rwx ic210
- If during this or any other step you get
unexpected error messages, talk to your
instructor.
- Now we want to change the current directory to the
new ic210 directory. The "cd" command changes the
directory, so enter this:
cd
		  ic210
- Make a new directory to hold your files for lab01:
mkdir lab01
- Change to this new directory:
cd lab01
- Let's verify that we are where we expect to be. Use the "pwd" command ("print what directory"). Enter this:
pwd
You should see a full listing of the "path" to your current working directory, which should look approximately like /home/mXXXXXX/ic210/lab01
- NOTE: For all labs and other work with your Unix
account, keep all of your files inside your ic210
folder. Inside the ic210 directory, make a new
directory for each lab, homework, project, etc. Do this
regardless of whether you are using a lab machine or
your own Bancroft machine.
|
| 1 |
Open your preferred text editor
In your terminal window type emacs& for
emacs, gvim for vi, or
gedit & for gedit.
|
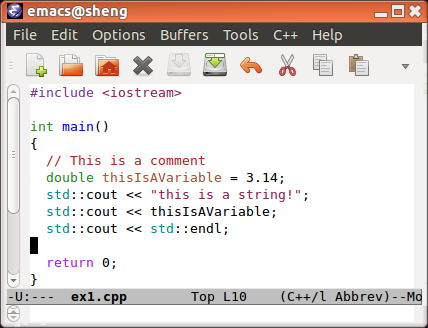
| 2 |
The editor window is where you type in
your source code.
The editor uses something called syntax
coloring to make it easier for you to
read the programs you have written. Syntax coloring
highlights the different program elements such as
comments, keywords, numbers, and variables. This allows
you to easily identify elements of your source code and
find common syntax mistakes quickly. For example, gedit
highlights comments in blue. If you see your source
code is blue then you likely forgot to close a comment
block. Additionally, the editor attempts to help in
other ways such as by providing automatic
indenting, aligning braces, and so
forth.
|
| 3 |
Give your file a name by saving it.
We could just starting typing in the default, unnamed file that appears, but eventually
the file needs a name. In addition, the syntax highlighting discusssed above won't work
until we give our file a name ending with .cpp (before that, the editor doesn't know what kind
of file we are working with!). So let's first save our file, even though right now it is empty:
- Find the menu for emacs and select File->Save As... from the menu.
- Navigate to the
ic210/lab01 folder,
using one of the directory options that appear at
left. You may need to first find the mXXXXXX
directory, then ic210, then find lab01).
- Name your file main.cpp and save it.
|
| 4 |
Create your main and add your include
statements. If you do not understand what you
are typing DO NOT BE CONCERNED. Your instructor will soon
explain required and essential elements of C++ programs.
Type the code exactly as shown below. |
|
#include <iostream>

int main()
{
  std::cout << "Hello World!" << std::endl;
  return 0;
}
|
|
|
When finished, save your file by clicking the Save icon,
choosing Save in the File menu, or use the key shortcut
ctrl-x ctrl-s.
|
| 5 |
Compile. If you want the
programs you write to actually do something then you
must compile them (turn source code into machine
language). Converting high-level C++ source code into
machine language is very complex, but compiler vendors
solve this problem for you. To compile your program,
first make sure that you have a terminal open from before, whose
current directory is where you saved main.cpp.
Once you are there, compile by typing into the terminal
g++ main.cpp -o m012345.
If your program compiled successfully, you should not see
any output from g++ (you will just see the
prompt, waiting for the next command) and there should
be a new file in your working directory called m012345.
(If you omit the "-o m012345", which we will often do,
then a file with default name of "a.out" is created.)
The new file is the "executable file" for your program.
If you do see any text output from g++, then get assistance from the
instructor. If there are errors, they will be listed in
the output. Tips for deciphering error messages are
given at the end of this tutorial.
Note: technically, the single command you issued
actually "compiled" and "linked" your
program.
We'll talk much later about this, but in short "linking"
(amongst other things) takes your code and combines it
with other code
provided elsewhere to do standard things like input and
output (this is referenced by the #include
<iostream> line in your code). Often, we'll
informally call this whole process "compiling."
|
| 6 |
Run! Once you successfully compiled
and linked your program (no errors), then you are ready to
execute your program. In your current working
directory, you will see a new file called
m012345 (or whatever you have named it). That is
your program. To execute a file, type the file's name preceded
by a "dot slash" (literally, "./") and hit the enter key.
Note: the "dot slash" is telling the computer to look for the program (m012345) in the current directory (indicated by the "dot"). In some cases you can get away with not including this, because your computer is set up to automatically look for commands in the current directory (amongst other places), but including the "dot slash" is safer because it will always work.
|
| 7 |
Program Output: Your program will
output to the same terminal from where it was executed,
as seen above. |
Now, let's view the executable file you just executed.
Type ls -l to list details of the contents of
your current working directory. There is a file named
main.cpp – it is your source code file. Note the size
of the file (95 byes in our example). The file called m012345 is your program's
executable file, which is combined with all of the other
necessary machine code to run your program. Note the size
(7782 bytes in our example)!! The increase in size is due to the code that was
“included” or linked into your program.
Part 3: Let's do it all over again!
You just accomplished quite a bit; you typed in a C++
program, compiled it and executed it. It is important that
you understand all the steps involved, and that you are
comfortable using a text editor and the terminal.
Repeat Part 2 of this lab all over again, with these changes:
- First, close all open windows (including the editor and terminal).
- In step 0, you've already created directories (mkdir) and change permissions (with chmod). You still
need to open a terminal and "cd" to the correct directory for lab01.
- Name your source file
add.cpp instead of main.cpp. Now, what do you need to change when you compile your program?
- Instead of entering the "Hello World" program, enter in this simple
addition program:
| add.cpp | sample run |
// (Your name and alpha)
// This program adds two numbers

#include <iostream>

int main()
{
  int number1, number2, sum;
  number1 = 12;
  number2 = 13;
  sum = number1 + number2;
  std::cout << "The sum of these two integers is " << sum << std::endl;

  return 0;
}
|
~/$ ./add
The sum of these two integers is 25
|
Compile your program giving the executable the
name add, and run it, making sure it prints out the
right answer! Fix it if it doesn't!
Show your instructor when you finish this part.
Part 4: The "error" of your ways
When you make certain kinds of common mistakes
(syntax errors), the compiler won't be able to
understand your program and will issue error statements in
the terminal window. Each error message includes a number, which
represents the line number of the error. Go to that line number to
see where the problem is. Every syntax error must be corrected
before a program will compile. Sometimes it is clear what's wrong,
and other times you may have a hard time figuring out how to correct
a syntax error. You will improve as you see enough errors to associate
the messages with the syntax error. Here are a few simple
rules and hints:
- Save program files before compiling
- If an error is flagged on a line that looks perfectly
fine, sometimes it is the preceding line that is messed up.
Check it too!
- Check for missing or extra ; and } characters
- Compile your program in small chunks. That way you can
focus on errors in a small section of code. Waiting to
compile until the entire program is completed can lead to
large numbers of errors.
- Messages that say "Cannot convert from ... to ..."
usually mean you are trying to assign the wrong type to a
variable.
- Check your typing. A common mistake is to name a
variable one thing but spell it wrong or use some other
name later.
- Sometimes, one simple problem can cause the compiler to
find tons of errors (like forgetting to include using
namespace std;. Correcting that one line can make all of
those errors go away. So, if you compile and see an
unusually large number of errors don't panic. Often a
simple change will correct them.
- If you can't figure out what's wrong - ASK!!!
Experience and practice help a lot here. So for each of the below,
purposefully make the syntax error in your current program and try to compile to see what the error message is.
Correct the error before introducing the next error into your
program (e.g., only add ONE ERROR at a time). Go slowly and pay attention, this will save you time later!
- remove a semi-colon.
- change a "<<" to a ">>".
- change the variable number1 to Number1.
- remove the ending }.
- remove the "#include <iostream>" line.
- change the "std" from "std::cout"
Part 5: More on Linux
You'll spend the rest of your time learning more about Linux and
the more powerful editors emacs/vi.
First review
the Unix command summary.
Then, open a terminal and practice entering all of the "Usage
Examples" (from the "Unix command summary" page) to see what
each command does (the commands need to be done in order).
Use "
ls" frequently to see what effect the commands
are having. Try at least one of the following editors, and both if you have time:
| Explore emacs |
Explore vim |
-
Launching Emacs
Launch emacs like this:
emacs&. That's
a linux thing, not an emacs thing. This way, emacs
launches but the terminal comes back for more commands
instead of waiting for emacs to finish.
If you want to edit or create a file at the same time
you're launching emacs, put the file name in before the
& sign. For example: emacs foo.cpp&.
- Don't Panic! If things get strange in emacs, hit ctrl-g. If that
doesn't clear up, try ctrl-].
-
Insert vs. Overwrite
Emacs works in either "insert" or "overwrite" mode just
like most text editors and word processors. The
"insert" key on your keyboard toggles between them. On
the bottom of the window you'll see "Ovwrt" when you're
in overwrite mode. Play with that.
-
Moving Around
Pressing ctrl and using the left or right arrows
jumps you word-by word through a line. Pressing ctrl
with the up or down arrows jumps you to chunks of text
separated by blank lines.
ctrl-a jumps you to the start of the line you're on, and
ctrl-e jumps you to the end.
-
Cutting and Pasting
The GUI's cut and paste works with emacs, but emacs
also has its own, separate system. ctrl-space sets a
start point, move with arrows to the end point of the
region you want to mark (it should highlight).
Then ctrl-w cuts the highlighted region into
the emacs version of the clipboard,
and ctrl y "yanks" it out at whatever point you
move the cursor to. If you want to copy the highlighted
region to the emacs version of the clipboard without
cutting it out of the text, that's esc-w.
-
My Favorite — ctrl-k
An alternative to marking a region is to use ctrl-k,
which kills the line from the point of your cursor to
the end of the line, adding it to the emacs version of
the clipboard. You can
do this multiple times to add multiple lines to the
buffer. Then use ctrl-y ("yank") as before.
-
Opening and Saving Files
ctrl-x ctrl-s saves the current buffer. ctrl-x
ctrl-w does "save as". ctrl-x ctrl-f lets you open a new buffer
(but wants you to give it a name and directory at the
same time) or an existing file.
-
Emacs Buffers vs. Files
Emacs distinguishes between "files" and "buffers".
A file is something that exists in a directory
somewhere. The thing that you are dealing with in emacs
is a "buffer" — a copy of the file in emacs's
memory. So when you type, you are changing the buffer,
and only by saving the buffer to the file does the file
itself change.
You can have multiple buffers open in emacs at the same time.
There's a "Buffers" menu you can use to switch between
them, and you can split the window to show multiple
buffers: ctrl-x 1 gives you a single buffer in the
window, ctrl-x 2 splits the window horizontally to show
two buffers, and ctrl-x 3 splits
the window vertically to show
two buffers
|
Try and learn a bit about Vim using the below references:
|
| lab01.cpp |
required output |
#include <iostream>

int main()
{
  std::cout << "Hello World!" << std::endl;
  std::cout << "This is a 1!" << std::endl;

  return 0;
}
|
Hello World!
Hello Solar System!
Hello Galaxy!
Hello Universe!
Hello ... ?
This is a 1!
This is a 2!
This is a 3!
This is a 4!
This is a 5! |
Important: Your focus is on using the editor to make these
changes as efficiently as possible! In other words, of course you can
do it, I want you to concentrate on doing it smart! It's almost a
puzzle to use as few keystrokes as possible.
Show your instructor when you finish this part.
Part 6: Submit to this lab01.cpp to the submission system
Step 1: Install the submit script to your virtual machine or
student (class) workstations:
You only need to do the following once for your Virtual Machine,
and once for your class workstation
(by installing this file on one class workstation it will be
available on all workstations for your use.)
- Log on
to http://submit.cs.usna.edu,
returning to this lab page after loggin in
-
Make a directory called
bin in your home
directory. This can be done as: mkdir ~/bin
- Click
on "Download
Personalized Submission Script", saving the file to the bin
directory under your home directory
- Open a terminal give the command:
chmod 700 ~/bin/submit
Step 2: Submit the program
In the same directory as the lab01.cpp file, give the following command:
~/bin/submit -c=IC210 -p=Lab01 lab01.cpp
The resulting output should include "The submission may be reviewed
online at" followed by a URL. Copy that URL and paste it into your
browser. The resulting page should tell you how you did. If you
did not get the output 100% correct, the page should give you an
indication of what's wrong with your output. Keep fixing your
program and resubmitting until it works perfectly.
Part 7: Finishing Up
You should now be comfortable with being
able to generate source code, compile it, execute the
program, and correct basic syntax errors -- all in Linux. Let's clean up so
you can get to your next class.
- Click the Power button in the top right corner and…
- Choose the Log Out option. You should *not* shutdown or restart the machine.
|